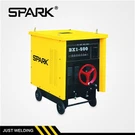

Hey there! As a supplier of the BX1 - 200C AC Welding Machine, I often get asked about how to connect the electrodes to this bad boy. So, I thought I'd put together this blog post to walk you through the process step by step.
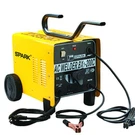
First off, let's talk a bit about the BX1 - 200C AC Welding Machine itself. It's a pretty nifty piece of equipment that's great for a variety of welding jobs. Whether you're a professional welder or just a DIY enthusiast, this machine can get the job done. You can check out more details about it on our website: BX1 - 200C AC Welding Machine.
Now, let's dive into the electrode connection process. Before you start, make sure you've got all the necessary safety gear on. That means wearing welding gloves, a welding helmet, and protective clothing. Safety first, folks!
Step 1: Power Off the Machine
This might seem like a no - brainer, but it's super important. Before you start connecting or disconnecting anything, turn off the power to the BX1 - 200C AC Welding Machine. This will prevent any accidental electric shocks. You don't want to end up getting zapped, trust me!
Step 2: Locate the Electrode Holder
The electrode holder is the part of the machine that holds the welding electrode. It's usually a clamp - like device attached to a cable. On the BX1 - 200C, it's easy to spot. It's designed in a way that makes it convenient to use during welding.
Step 3: Prepare the Electrode
Take the welding electrode you're going to use. Make sure it's the right type for your welding job. Different electrodes are used for different materials and welding techniques. For example, if you're welding mild steel, you'll need a different electrode than if you're welding stainless steel.
Step 4: Insert the Electrode into the Holder
Open the jaws of the electrode holder. You can do this by squeezing the handle of the holder. Once the jaws are open, insert the end of the electrode into the holder. Make sure it's inserted firmly. You don't want the electrode to fall out during welding. Close the jaws of the holder to secure the electrode in place.
Step 5: Check the Connection
Give the electrode a little tug to make sure it's securely held in the holder. If it moves around too much, open the jaws again and adjust the electrode until it's firmly in place. A loose electrode can cause all sorts of problems, like poor welding quality and even damage to the machine.
Step 6: Ground Connection
Now, we need to talk about the ground connection. The ground clamp is another important part of the welding setup. It's usually a clip - like device attached to a cable. Find a clean, bare metal surface on the workpiece or the welding table. Attach the ground clamp to this surface. This provides a path for the electrical current to flow during welding. Make sure the ground connection is good. A poor ground connection can lead to unstable welding arcs and other issues.
Step 7: Power On the Machine
Once you've connected the electrode and the ground clamp, it's time to turn on the power to the BX1 - 200C AC Welding Machine. Set the welding current to the appropriate level for your electrode and the thickness of the material you're welding. You might need to do a bit of trial and error to get the right setting.
Step 8: Start Welding
With everything connected and the machine powered on, you're ready to start welding. Hold the electrode at the right angle to the workpiece and strike an arc. This is done by briefly touching the electrode to the workpiece and then pulling it back slightly. Once the arc is established, you can start moving the electrode along the joint you're welding.


It's important to note that practice makes perfect when it comes to welding. Don't be discouraged if your first few welds don't turn out perfect. Keep at it, and you'll get better over time.
Now, if you're thinking about other welding machines we offer, we also have the BX1 - 200B AC Welding Machine and the Portable AC ARC Welding Machine. These machines are also great options depending on your specific needs.
If you're interested in purchasing any of our welding machines or have any questions about electrode connection or welding in general, don't hesitate to reach out. We're here to help you with all your welding needs. Whether you're a small - scale DIYer or a large - scale industrial user, we've got the right welding solution for you.
References
- Welding Handbook, American Welding Society
- Practical Welding Engineering, ASM International